Rugby league focuses on the key skills of handling, passing, running and tackling. Players are expected to have quick hands, good sprint speed with bursts of pace to try to break tackles, and the strength to tackle and halt their opponents’ runs.
Here are 5 drills that we hope you will find useful to help your rugby league players enhance these key skills.
1. Protect the treasure
Recommended size: 20m x 20m
Objectives
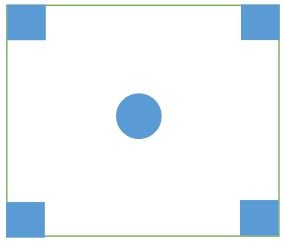 Split the students up into 4/5 teams depending on the size of the group and numbers available. You can either have four groups around the edge and one in the middle as guards or you can have three around the edge and have one group as the guards.
Place one group in each of the corner areas and, in the circle in the middle, place as many footballs, rugby balls, bibs, cones, etc. as you can. Each item can have a different points value depending on how awkward it will be to pick up at speed (e.g. 1 point for a cone, 3 for a ball, 5 for a bib).
This is the ‘treasure’ that the students outside of the circle are attempting to ‘steal’ from the guards and bring back to their group. The guards in the circle have to try to stop their ‘treasure’ from being captured.
Allow one student from each group to attempt to collect one or more items from the middle. They will need to escape from the guards after collecting their ‘treasure’. If a guard touches someone whilst they are trying to escape with their item(s), they must go back to their corner without any treasure.
You can create a league table to record the points scored by each team and, of course, rotate the guard duty!
Teaching points
- Attackers should run at pace and not stop as this loses momentum, work on quick footwork when approaching the defenders.
- Defenders should stay as a solid unit, working together to restrict the spaces in and around the area, talking is a huge part of this exercise for all the students to be able to organise themselves and their team mates around them.
- Progression: allow more than one player at a time from each group to get the treasure. Another progression with a high ability group is to introduce passing into this drill at differing stages.
2. The Channel
Recommended size: 25m x 15m
Objectives
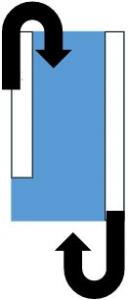 Tell the students to get into pairs of similar ability, give each group a number (the same number applies to both students), and position them at opposite ends of the channel so that there is one student with each team number at either end of the channel.
When the teacher calls out a number, both students with that number will sprint to the opposite end of their channel.
The player who reaches their finish line before their opponent reaches the opposite finish line will then receive a pass from the teacher.
The winning student needs to gather the ball as cleanly as possible and then attempt to take on their opposition and score a try at their finish line. Depending on the age group, this can be touch or full contact training.
The passes from the teacher should be varied to allow for real life game decisions to be made about a bouncing ball, a high ball, ones not directed at the chest, etc.
Teaching points
- Quick footwork, attacking opponent at speed.
- Handle the ball in either two hands or one hand.
- Tackle low and slide down the legs of the player, keeping hold of the ankles to not allow the player to become free. Body position and timing of correct body position.
- Progression: add more players into the channel to allow for passing and running decisions to be made, defensive team can work on their defensive line.
3. Beat your opponent
Recommended size: 30m x 30m
Objectives
 Place half of the rugby balls on the back line behind one side, and the other on the opposite line outside of the area.
Each team is trying to get their balls from their side of the grid to the opposition line. Only one ball per team is allowed in play and players can only be tackled in the opposition half.
A point is scored for every try that is scored. To prevent a try being scored, the opposition must tag a player when they come into their area.
Teaching points
- Any number of players can attack the opposition but make them aware of the hazards of committing too many attackers forward (leaving gaps defensively).
- Skilled players may be able to kick the ball over the defending team or be able to play a grubber kick through the defence.
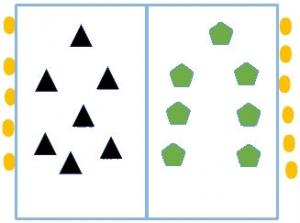
4. League Island
Recommended size: 25m x 25m
Objectives
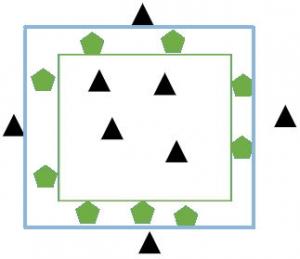 Split the group up into two teams, with one of those teams needing to be split into half again (see diagram). The area needs to be marked with a larger grid and one smaller square being placed on the inside of the main grid.
This drill can be used to help teach the students about the techniques used in passing – with two hands, aiming for the chest, receiver being ready for the pass, etc. After passing techniques have been learned, you can then introduce them to passing backwards as they would in a game of rugby .
The aim of the drill is for one team (triangles) to move the ball from outside the grid to their team mates in the centre and then back out of the grid again.
Every time the ball passes the defenders (pentagons) a point is scored. If the defensive team intercepts the ball then they score a point. After 5 minutes, swap the teams over and see who can achieve the greatest number of points.
Depending on the ability of the group, they can either organise themselves or be organised by the teacher.
5. League Ball
Recommended size: 25m x 25m
Objectives
 This drill is very similar to kickball/baseball except adapted for rugby league.
This could be used as an assessment game to see if the students are using the correct technique when passing and kicking.
The teacher will need to split the group into 2 teams, a batting and a bowling team. The player in the middle starts with the ball (the ‘bowler’) and will perform a rugby pass to the opposition player in the ‘batting’ square.
The ‘batter’ will then catch the ball and will kick the ball out towards the opposition players who are ‘fielding’. The ‘batter’ has the option of performing a drop kick, grubber kick or punt kick. He/she will decide which is the which is the most effective kicking option having looked at the field positions of the fielding team.
‘Batters’ have 2 seconds after catching the ball to kick it otherwise they are ‘out’. The team have three ‘outs’ before they swap over with the fielding team. As in baseball, the ‘batter’ stops at each base until they are either safe at a base (or have scored a point by passing home base) or tagged with the ball whilst running around the bases.
The kicks must be in the V between first and third bases. If it bounces inside the V and then bounces out, this is allowed and the batter can run as far as the bowling team allow him. If however it does bounce out of the V first time then the batter gets another kick. The ‘batter’ is out if their kick is caught before the ball bounces.